Friday, 27 September 2013

September 27, 2013 – How Do You Like This Apple?

It’s Friday!
Last Wednesday (September 18th), Apple released the latest update to its operating system for iPads and iPhones, iOS7. While there are many new and exciting features, and a sleek new designs layout, there are some drawbacks, not the least of which has been reported motion sickness with the zooming and animations.   Although you are not currently required to update the operating system on your iPad, you will need to upgrade at some point and I thought I would provide step-by-step instructions on how to complete this task as well as a few tips and tricks you can use with your iPad.

Upgrading:
First, be sure your device is connected to a wifi network such as UGDSB public or your own home wifi system.  If you are upgrading your own personal device, this is a key step too so that you will not be charged for large amounts of data usage.  Also, you may wish to connect your iPad to a power source, so there is no chance for it shutting down during the process.  Go to ‘Settings’, tap on ‘General’ and then ‘Software Update’. Your current operating system will automatically begin checking for updates.  If an update is available, tap ‘Download” and the process will begin.  Once the download is complete you will receive a notification that the system is ready to install, tap on ‘Install Now’ and wait for the device to complete this process.  If your iPad has a great deal of apps, videos, or pictures stored on it, you may receive the message that “This update requires at least X.XG of storage”.  In this case, you can use iTunes to complete the installation if you are able to connect it to your own personal device (many UGDSB desktops and laptops are unable to install iTunes) or simply delete some videos or apps you no longer use and begin the process.

So what’s new?
The first thing you will notice about the new operating system will be the look of the lock screen, password and home screen.  Additionally, the home page icons may not appear to all be there.  This is because your folders will now have multiple pages and there is no limit to the number of apps you can store in a single folder.  When you open a folder you may see dots along the bottom of the insert, these indicate how many pages are within the folder and which page you are currently viewing.  By swiping to the left or right, the next set of apps will appear for you to tap to open.  This will end the multiple folders titled ‘Math 1’, ‘Math 2’, ‘Math 3’, etc. 

You may be wondering where your search feature has gone, considering swiping to the right from the home screen no longer brings up this feature.  Instead, swiping from the top down on the home screen will bring up your search bar and keyboard. 

Closing running apps used to be achieved by double clicking on the home button. While this is still the case, there are a couple new changes.  Simply swipe each app toward the top of the iPad and it will disappear.  If you are feeling particularly savvy, or pressed for time, you can close multiple apps at one time by swiping upwards with multiple fingers on each app.  Swiping from the left or right and tapping on an app, will allow you to switch between apps that are currently open.
In mail or settings, etc. you can swipe from left to right (backwards swiping) and it will allow you to return to the previous page. 

iOS7 has some new sounds available for use as notifications, you may like to explore these by tapping ‘Settings’ and going to ‘Sounds’ 

Useful for teaching is the iPad dictionary feature.  When you are reading an ebook or article online, simply touch and hold the desired word and it will highlight, then tap on define. 

Finally, one key feature I would like to highlight is the restrictions function.  As a teacher, multiple students may be using the device in one day and some tech savvy children may be able to delete or install apps on the iPad without our permission.  Instead we can lock the ability to perform these functions unless a password is provided.  Go to “Settings” and tap on “General”.  You will have to scroll down to “Restrictions” and tap “Enable Restrictions”.  Here you will be asked to enter a four digit passcode.  Then you are able to allow or deny access to multiple features on the iPad such as FaceTime, iTunes store in addition to Adding and Deleting Apps.  Also, you can alter the level of content allowed for the various features, so there is no chance of students playing inappropriate videos or visiting adult content websites accidentally.

So, while it is not necessary to update your iPad with the new operating system now, it will become a requirement in the future; and although there may be a few bugs and kinks in the system, there is no reason to fear updating your iPad to iOS7.  I do however suggest trying it at the end of the day when you will not need it and getting used to the new features and app layout.  This way you will not be frustrated trying to find an app you had wanted to use in a lesson, or share with a student.

If there are any questions regarding the new operating system or iPads, please feel free to message me. 

Have a great weekend,
Stace
  

Friday, 20 September 2013

September 20th, 2013 - A Couple Tips and Tools

Welcome to the weekend!!

This week I have a few different tools for you - one to help you with your younger students and a tips for teachers on First Class and an online website for downloading videos.

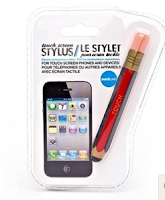
First for those primary teachers who are using iPads in the classroom - a fun stylus which can help students build up their fine motor skills.  Chapters and staples are now carrying stylus’ which look like shorter versions of pencils and pens, and work the same as a tap or swipe on the iPad.  The ‘Touch Screen Stylus’ is made of electro-conductive rubber and is about $12.  It can be held exactly like a pencil and used to trace letters in apps such as ‘Alphabet Tracing’ and ‘Cursive Writing’.  They are much easier to hold than traditional thinner pencils and the rubberized feel allow for a comfortable grip.  A great find for younger students!

So, are you getting tired of searching all over First Class, the Cloud and your home email for all of your messages? Follow these simple instructions to have your first class messages forwarded to the cloud for ‘one stop shopping for all of your messages.’
First, sign on to your first class account.   Click on ‘Preferences’ in the menu on the left.  Next, click on the +  sign next to the ‘Messaging’ option on the lower part of the page - you should see a section on Mailbox rules with a two gear icon.  Scroll down a bit to “automatically forward” and select ‘Yes’ from the drop down menus for both 'local mail' and 'internet mail'.  Then in the box below where it asks where to ‘Forward to’ type in your UGCloud email address.  Your messages will automatically begin being forwarded and a copy will also remain on the First Class account for future viewing.  Don't forget to download the First Class app for your iPad or iPhone - its much easier than logging on in Safari or Chrome!

Finally, here is a website to help you download videos from the web.  It’s called Keepvid.  By entering www.keepvid.com in the address bar of your web browser, you will be directed to a very plain and basic looking website.  Here you can enter the URL or web address of the video you would like to download.  Then by clicking on the ‘Download button’ your video is processed and a pop up window tells you when your video is ready for downloading.  Also available is a ‘bookmarklet’ for easier downloading of the videos right when you are on the page.  You simply drag and drop the bookmarklet button into your toolbar and when you find a video you would like to download merely click on the button and it will automatically bring you to the website and offer the option to download or view the movie.

I hope these tools are helpful for you in your teaching…
Have a great weekend!

Cheers,
Stace


Friday, 13 September 2013

September 13, 2013 – All your favourites in your ‘Pocket’

Happy Friday the Thirteenth everyone!!

This week I have chosen to share with you a fun tool which can be used as an app on the iPad, with Twitter and accessed from your desktop computers.  ‘Pocket’ (formerly Read it Later) is a great way to bookmark and store all of those great articles you come across or have been recommended to you.  If you are like me, your computer is full of folders and the bookmark bar is jammed with online webpages you want to come back to when you have more time for reading.  Pocket is a great way to retain all of those articles in one place, and tag them with key words so you can easily find them later. 

iPad, iPhones and Twitter with Pocket:
The Pocket app can be purchased from the app store for free or you can go to the user website (http://getpocket.com) and create a user account (also free).  When you are surfing twitter and someone recommends a great article they have just read, simply click on the link in the tweet and the article will open in a new window.  Here you will see a box with an arrow emerging from it in the top right hand corner.  Tap on this icon and select ‘Mail Link’.  Next an email message will appear and you simply type in add@getpocket.com in the ‘To’ line of the message.  When you tap send, the article will be added to your list of saved articles.  This is the same procedure to use if you are surfing with an iPad and find useful material you would like to return to later.

Chrome Extension:
Pocket is available as a free extension from the Google Web store.  When you purchase it from the Web Store, the icon will appear in the top bar of your web browser next to the web address.  When you come across a page you would like to read at a later date, simply click on the pocket icon and a header will appear at the top of the page stating that the ‘page has been saved’.  You will also be offered the option of adding ‘tags’ to the page.  This allows you to include key words which describe the article or remind you of what the article is about so you can find it much easier later.  

Bookmarklet: 

Pocket is available as a bookmarklet (button on your tool bar) so that all you need to do is click on the button when you would like to save a webpage to your personal pocket of items.  To add the bookmarklet to the tool bar you may visit the following webpage (http://getpocket.com/welcome?b=Bookmarklet) for complete and simple instructions

Accessing your articles and marked pages:
When you find yourself with a little time on your hands (not likely for a teacher, I know) or when you would like to retrieve an item you have stored, simply open the pocket app on the iPad or iPhone and log into your account.  Here you can find all of your items, in one location.  By tapping on the desired article, Pocket will open the item and you can continue reading.  From your desktop computer simply go to the pocket website (http://getpocket.com) to sign into your account.  Here all of your articles, videos, and images will be listed for you; with a click a new window opens and you are able to read the item. 

I hope this helps get you organized a bit and will allow you to clear out some of the bookmarks you have stored on your computer.

Past Tech Tidbits posts can be found on the blog at http://techtidbitz.blogspot.ca and if you have an idea for a future blog topic, please feel free to pass it along to me.

Cheers,
Stace


Friday, 6 September 2013

September 5, 2013 – Shiny New Chromebook Tips


 Hello everyone and welcome back to school!!  I hope that you had a relaxing and enjoyable summer break.

With the new UGDSB computer refresh in full swing, and many schools trying to become more familiar with the new Chromebooks, I thought I would write a post which includes a few tips and tricks for these new computers.

The top row of the keyboard has a few symbols which you may not be familiar with:

 Returns to the previous webpage - works similar to F1 on the desktop


 Advances to the next webpage in your browser history – similar to F2


Reloads the current webpage – Similar to F3


 Brings the webpage view into full screen – F4


 Switches to the next window 


 Decreases the brightness of the screen


 Increases the brightness of the screen


Mutes the volume of the computer


 Volume decrease


 Volume increase


 This search key allows you to search the apps on your computer in addition to the internet.  When you press the search key, a pop up will appear showing your current Google apps.  As you begin tying the keyword you are searching for, the Chromebook will offer options which are similar to your search item.  By clicking on the item from the list, the app or webpage will open to the chosen option.

If you are having difficulty viewing the text on a webpage, simply click on CTRL and the + sign to increase the text size.  The text size will increase progressively each time they are depressed.  Similarly, pressing CTRL and – at the same time will decrease the size of webpage text.  Finally, pressing CTRL and 0 (zero) will return the text size to the original 100%.

Missing the Caps Lock key?  Simply press ALT and Search and a notification will pop up on the screen showing that the caps lock is on. To turn it off, simply press the search or shift key.
 
No Delete key? You can use Alt and    to remove text or images you no longer want. 
  
Looking for more shortcuts?  From the home screen press CTRL ALT and ? and you will bring up an image of the key board on your screen.   Then by pressing CRTL or ALT you will see the possible key combinations and shortcuts available to be used.

I hope that these tips are beneficial as you begin exploring what the Chromebook can do for you and your students.  If you have any questions about the shortcuts I have mentioned above or if you would like assistance with any other tech related topic, please feel free to contact me. 

As always, past Tech Tidbits posts can be found on the blog at http://techtidbitz.blogspot.ca/ and if you have an idea for a future blog topic, please feel free to pass it along to me.

Thanks and here’s to another fantastic year,

Stace